well i sent the distributor back yesterday and it should be there by thursday and hopefully returned to me in 2 mondays. The first day of my vacation:rockon:
was digging thru some pics and came across a couple of good ones:)


![]()
well i sent the distributor back yesterday and it should be there by thursday and hopefully returned to me in 2 mondays. The first day of my vacation:rockon:
was digging thru some pics and came across a couple of good ones:)
![]()
is the firing order of the spark plugs correct?
yeah, I check that like 3 times:giggle:
how did you make your stock rims shine so good? i have the same ones and want them to look like that =)
I manage a carwash for a living.
Lo PH solutions are your friend when it comes to chrome, glass and wheels. well that and a dish sponge scouring pad and a little elbow greese:up:
i appreciate you telling me, but ive done all that, i cant find away to get rid of the accumulated brake dust if you cant see much trust me its bad haha

Actually, mine where almost that bad before I got my hands on them;)
if i where to take a close up, its got the same corrosion around the cap, lugs and lip just like yours. Thats why I need to get my other set on:P
Shoot me an email, maybe I can offer you some suggestions
Glynn, my brother also had a distributor from the King, but his rotor screw fell out while driving. That sure made a mess of things. If the distributor doesn’t solve your problem, shoot me an e-mail and I’ll send you my phone number. I’ll walk through the problem with you and see if we can’t get it figured out.
Dan, Your the Man :hi5:
Im actually headed out right now to look into those brakelines for you. ![]()
Lookin good man, IMO you should ditch the gold emblems and get the silver ones…
very very nice.
every time i see a thread with pics of radiator supports… it makes me want to take my car in for a new one.
integras look SO much better when the front end lines up nice and straight.
mine is only off like an inch where the hood overlaps on the bumper, but its enough to drive me nuts. ![]()
2nd that, Golds been played out since I was a freshman in HS :rimshot:
[QUOTE=Malformed;1890371]very very nice.
every time i see a thread with pics of radiator supports… it makes me want to take my car in for a new one.
integras look SO much better when the front end lines up nice and straight.
mine is only off like an inch where the hood overlaps on the bumper, but its enough to drive me nuts. ![]() [/QUOTE]
[/QUOTE]
mine was off by about the same, Also drove me nuts every time i looked at it:D
I havent done anything in last couple of days, but I figgured I would go into the guage set up as it stands right now. Its changed from the pictures, due to some enlightenment from member Kyle10182. It wasnt a pretty way to suggest it, but I do appreciate it if your out there.
I hate Jerry Rigged shit and ill be damed if I have a car with a whole mess of loose wires just hanging around in the engine bay. So I decided to take the other engine wire harness I have for my other motor and incorparate all the wires for my after markets sensors for the O/P, F/P, W/B and V-tec into a the haness and then make a seconday dash harness for the cab.
1st is 1st. I have to give mad props to member Bobloblaw, who apperntly is to busy to get on anymore. :roll: with out his steady hand and sodering knowledge. this whole thing would be a mess.
After grabing a couple of Stock engine to main harness pluggs I cut off of a junker from one of the local yards. I set out on the daunting task of marking wires with numbers and makeing a xecel spread sheet to help me keep track of wires.
Then I took the Wire harness and layed it out to determine how much wire i need to cut off of each of the harness’s to get all of them in the right spot. then I took all the wires with plugs and zip tied them to the engine harnsee in the spots where they need to go.
All the wires in place, waiting for the harness plug
After doing this for every wire
This was the finished product for the engine side
Now on to the cab side.
I Decided to use the huge gapping whole that is usualy occupied but the A/C system. Worked out perfect if you ask me. I took the other half of all the wire harnesses for the quages and used the shell I had in the garage to determine how much wire I needed to add to the Aem o2 sensor to get it over to the A pillar. Keep in mind that in this picture, I havent trimed all of the power and ground wires down and i havnt added the plug that goes into the guage
Fire wall gromet with harness and vtec and o2 output signal wires.
this is how my inteded set up was. My original intent was for the tunner sitting in the passenger seat having a spot to keep his eye on the guages, but thats what dataloging is for, I guess
The somewhat finished piece
I dont have any good pictures of the guages in the car, but you can use your imagination till i get some good one.
In Order too get the Fuel pressure guage to work i needed a sending unit. So i went and had my boy at pirtek make up this fuel line.
It actually works, realy well, minus the fact its got a small vapor leak at the brazing, nothing he cant fix. just havent had the time.
And that just makes me come to realize. I was just there today:bang: so be expecting a call from me tomarrow, Mr. Guru
nice build friend appreciate you timing my cart the other night hahaha panda teg tell craig im sorry i didnt mean to park my hunk of junk next to his cavalier my deepest apologies but she romps quite nicely ![]() I finally got to redline it a few times let me know when your ready to work on those dents you were telling me about
I finally got to redline it a few times let me know when your ready to work on those dents you were telling me about ![]()
really nice build mon, im learning so much by reading these for my db1 build
![]() dont worry, you actually made that thing look good for once, Good to hear you can finnaly romp on that thing:up:
dont worry, you actually made that thing look good for once, Good to hear you can finnaly romp on that thing:up:
Thank bro. good to hear im giving back to something, ive taken so much from:hi5:
Well havent got much done lately, but here what has been
I got the radiatior drained and out of the car “again” in preparation for the installation of this:rockon:
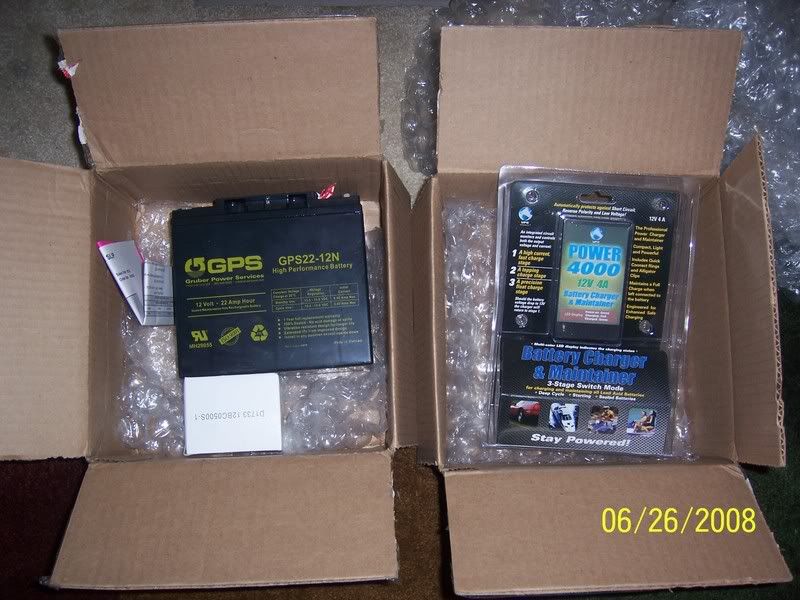
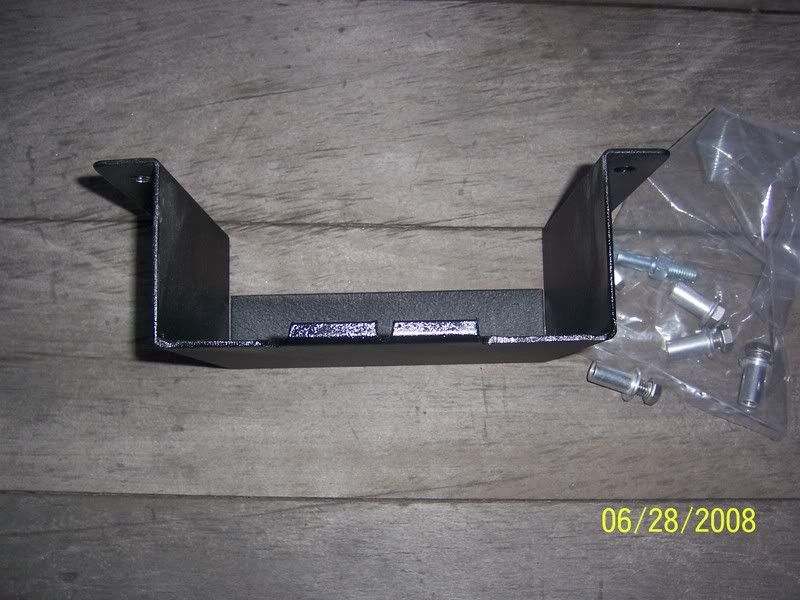
Order a battery bracket for SEP Technoligies. It took a little moding, but it will work just fine.
Also picked up some aluminun Rivnuts and SS bolts:werd:

last but not least, I got word on my dist. and it was shipped out yesterday.
Im off all week:rockon:, so hopefully I should be able to get what needs to be done, finished up and maybe even be able to take it up to bueana vista for my rafting trip:cross:
over the last week, and after looking at placement on the battery on the framerail and deciding that im going to relocate it to the trunk
ive mangaged to get all of the wiring in for the battery, and most of the mount together so the battery can go in.
pics of progress:rockon:
first off the OE sound deadening material had to go.


having a little fun:)

Cleaned up a bit

Moving on to the battery bracket


and on to mangeling the floor pan, as you can tell im not the best fabricator, but fuction of form any day of the week


First and second rivnut in and set


Due to the fact the rear to rivnuts sit right in the middle of the rear subframe. I decided to leave them for a little bit and make sure i want to do the rivnut and not just a regular nut and bolt setup.
In the mean while, I moved on to running the wires. Im using 4 guage wire from the battery to the disribution block and as the ground wire. then from the distribution block, its split down to a 4 guage for the starter and 10 guage for the fuse box.
having a father whos an electrican has it perks. Never in my wildest dreams would I ever imagine a wire crimper this big:giggle:

power and ground wires in place


hear you can see the routing of the power wires to the starter and fusebox in there unfinised state. A little wire loom should clean it up very nicely:rockon:


Im getting there, now if i could just get my dam distributor back:bang:
Nice build man, ![]() I’ll be following up on this… also subscribing to see if you figure out your starting issue. The way you described it, sounds EXACTLY like my db1 lol, this weekend I’ll double check the timing, and try again. I even got the same fireball out the intake hehe…good luck with everything man, keep it up!
I’ll be following up on this… also subscribing to see if you figure out your starting issue. The way you described it, sounds EXACTLY like my db1 lol, this weekend I’ll double check the timing, and try again. I even got the same fireball out the intake hehe…good luck with everything man, keep it up!
Looking good man!